Create, edit, or delete field mappings
Linked field mappings let you connect multiple values so that Rant & Rave can automatically fill empty fields for you. For example, you could connect an agent’s ID to their name so that when one field is populated, Rant & Rave can automatically complete the other one.
Example: If there’s an agent called John Smith with the agent ID 1234, you can connect the name and ID with a field mapping. After that, if you receive a piece of feedback with the Agent ID 1234, the name John Smith will be automatically added to the Agent Name field.
You can add mappings individually or import them in bulk—once field mappings are added, they can only be removed or edited one at a time.
Create a field mapping
-
Open the Rant & Rave Dashboard.
-
Click Settings.
-
Click Field mappings in the left pane.
You'll see a list of any existing field mappings.
-
Click Add mapping.
A new row will be added under the existing mappings.
-
Select the structured field name from the drop-down menu, then enter the mapping and the value it should display.
-
Click
 to confirm.
Edit or delete a field mapping
-
Open the Rant & Rave Dashboard.
-
Click Settings.
-
Click Field mappings in the left pane.
You'll see a list of any existing field mappings.
-
Click
 to make changes or
  to delete.
Import your field mappings
You can import your field mappings in bulk, but you can only delete them individually, so make sure you double-check everything is correct in your import file before you upload it.
-
Open the Rant & Rave Dashboard.
-
Click Settings.
-
Click Field mappings in the left pane.
You'll see a list of any existing field mappings.
-
Click Export.
The import file will begin to download.
-
Open the import file.
-
Fill in your mapping; the file is formatted as follows:
Column
Content Field Choose the field you'll use as the root for your mapping: for example, if you want to map the Adviser "John Smith" with his Agent ID and Team Leader, choose Adviser under this column.
Make sure you choose a mappable field from the Dashboard.
Mapping Choose the field option that you want to map from—it must be an option from the field you just selected. For example, if you select the field Adviser, you should enter one of your advisers in this field (eg. John Smith). Meta Leave this column blank (it acts like a dividing line when communicating with the Dashboard). Team manager Enter the name of a team manager if you want to map them to the selection in your Field and Mapping columns. Team name Enter a team name if you want to map it to the selection in your Field and Mapping columns. Store name Enter a store name if you want to map it to the selection in your Field and Mapping columns. Store manager Enter the name of a store manager if you want to map them to the selection in your Field and Mapping columns. Product Enter the name of a product if you want to map it to the selection in your Field and Mapping columns. 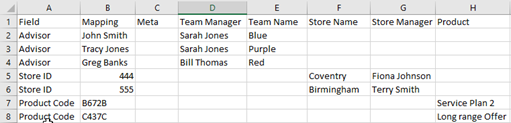
Example: After the above import file is uploaded, when "John Smith" is entered into the Advisor field, the Team manager field will automatically be filled with "Sarah Jones", and the Team name field will automatically be filled with "Blue".
-
Save the file somewhere accessible.
-
Reopen your list of field mappings and click Upload.
-
Find the file, and click Open.
Your field mappings are uploaded to Rant & Rave.